in: Acumatica Tips and Tricks, Acumatica Tips & Tricks, Acumatica, Company News
Continuing in our Acumatica Payroll series, today’s tutorial will explore how to configure time tracking. Time tracking allows us to track employee time in payroll to calculate pay. First, be sure that you have set up payment methods specifically for direct deposit. See our tutorial from July on Setting up Payment Methods in Acumatica.
There are three steps to the process of basic time tracking configuration. These steps are the minimum configuration requirements for time reporting and must be completed. Let’s get started.
Using Acumatica Payroll
Step 1: Make sure that the Time Management feature is enabled in the Enable/Disable Features form.
Navigate to → System Management → Licensing.
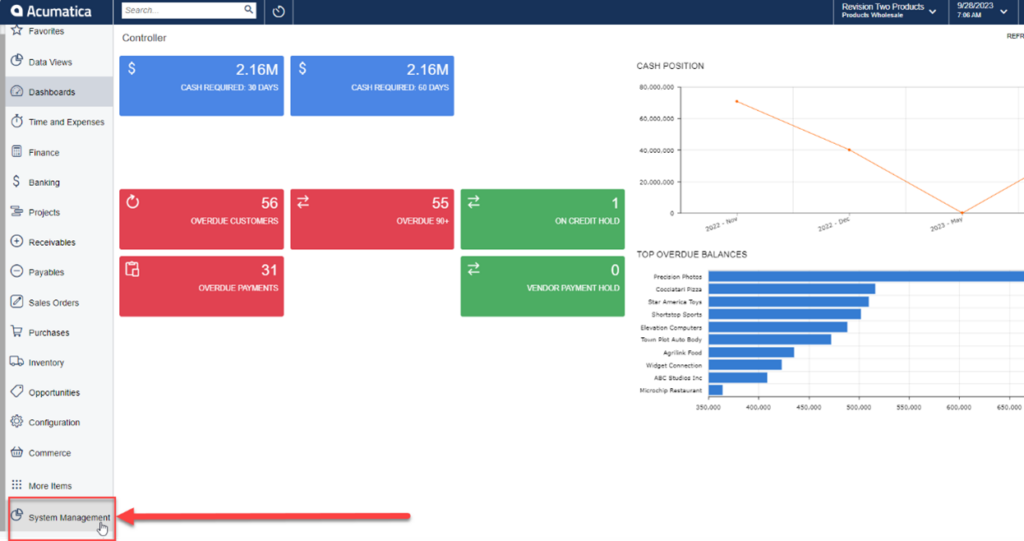
Under Licensing, click on Enable/Disable Features.

In the Enable/Disable Features screen, scroll down and find Time Management. Check that this box is marked. If your company uses shift differential, make sure that box is checked as well. Typically, this is done by the system administrator during setup. If you are not the administrator, check with them to get this completed. Step 1 is complete.

Step 2: Make sure each employee needing to report time activities is in a proper workgroup and that their manager is included in a parent workgroup to review and approve reported time.
Navigate to Configuration → Company Tree
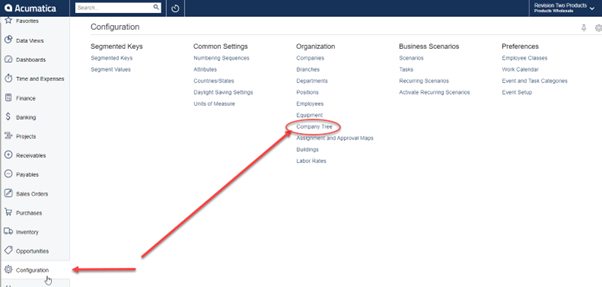
On the Company Tree, select employees that need to report time activities in their workgroup. First, select the branch.

Then, add employees to that branch as needed.
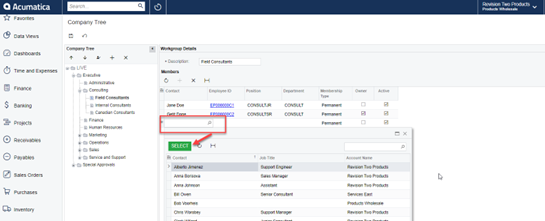
Make sure that in a parent branch, a Manager or Owner is marked as one who approves time activities. Once company tree is configured, hit save. Step 2 is completed.

Step 3: Make sure the Track Time and Costs box is checked for the Work Item activity type, which will be used for logging employee time.
Navigate to Time and Expenses → Activity Types

The Activity Types form is used to add, view, edit, and delete activity types that can be used for tracking employees’ time spent on that activity. If selected, a check box indicates that tracking time and costs is enabled by default for new project-related activities of this type.
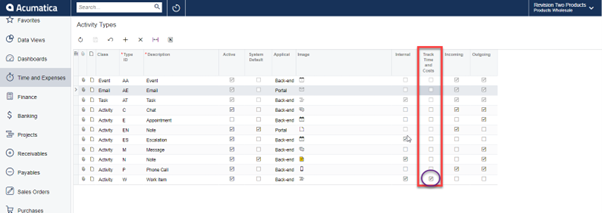
Make sure that each activity needed for time tracking is checked on this screen. Once all desired activities are selected, simply hit save and exit the screen. Step 3 is complete.
